Wednesday, May 29, 2013

Beer and Jack Chili Mac

Luke has had to work late the past two nights - huge bummer, but at least he's not deployed or training off-island! Yet. I tried something new for dinner, and it made so much that I ended up taking some to him and the person with whom he's working tonight. Before I even made it the one-mile drive from the block house to our house, he had texted me to ask for more. It is that good. I love it when a recipe from pinterest turns out to be as amazing as it sounds. This recipe for beer and jack chili mac (link) was so fantastic. The mac and cheese is so good that I'd eat it alone, but it was really amazing with the chili too. I made the mac and cheese exactly as the original recipe states, but I made a few changes for the chili based on what I had in my pantry and the fact that my husband does not approve of meatless dinners.

For the mac and cheese:
1 box elbow noodles
2 tbsp butter
3 tbsp flour
1 cup beer (I used Corona)
1 cup cream
8 oz pepper jack cheese, shredded
4 oz cheddar cheese, shredded
4 oz Neufchatel cream cheese

For the chili:
2 tbsp butter
1/2 onion, diced
1/2 jalapeño, diced
2 cloves garlic, minced
1 16-oz can crushed tomatoes
1 cup beer (again, Corona)
1 can black beans
1 can rotel tomatoes
1 can fiesta corn
1 tbsp chili powder
1 tsp cumin
1 tsp salt
1 tsp balsamic vinegar
1 lb ground beef, browned

So in the original recipe, it says to make the mac and cheese first. However, the chili has to simmer for 30 minutes, so when I make this next time, I'll make the chili first and make the mac and cheese while it's simmering to cut down on wasted time.

Saute the onion, garlic, and jalapeño in the butter until the onion is translucent. In a large pot, combine all of the chili ingredients, and cover this and let it simmer for 30 minutes. Meanwhile, prepare the macaroni noodles. I used my pasta boat so I could forget about the noodles while I was making the sauce. In a large skillet, melt the mac and cheese butter and add the flour, whisking until a paste forms. Whisk in the beer and cream. Bring it to a low boil, and then add the cheeses. Combine until they're thoroughly melted. Pour the cheese sauce over the noodles and mix.

Lastly, add the macaroni to the chili. I found that making a whole box of macaroni was too much to be added to this amount of chili, so I added about 2/3 of the macaroni to the chili. Bonus: now I have beer and jack macaroni to eat too! Next time I make this, I think I'll make some cheddar jalapeño cornbread to go with it!

Oatmeal S'more Cookies

Last night, we had a potluck cookout with OCF. I love these things because the food is always amazing (bacon-wrapped pork and bacon-wrapped chicken. seriously.) and it's a great time to socialize outside of our regular Bible study gatherings. I made Parmesan orzo and oatmeal s'more cookies. I love oatmeal cookies, and I love s'mores, so I LOVED these cookies. They were really easy to make too, so that's always a plus, especially since I went straight from work to the commissary and back home to bake right beforehand. Nothing like putting it off til the last minute! I found this recipe on pinterest, but had to do it a little differently, particularly because I did not have an hour to chill the dough, again citing my last-minuteness.

1 cup butter
1 cup brown sugar
1/2 cup sugar
2 eggs
1/4 cup milk
1 tbsp vanilla
4 cups rolled oats
1 cup crushed graham crackers
1 1/2 cups all purpose flour
1 tsp baking soda
1 tsp baking powder
1 tsp cinnamon
1/2 tsp salt

1 jar (or homemade! ...ain't nobody got time for that) marshmallow cream sauce
30-40 Hershey's dark chocolate kisses

In/with a mixer, cream the butter and sugars until it's fluffy. All the eggs one at a time, followed by the milk and vanilla. In a separate bowl, combine the dry ingredients. Gradually incorporate the fry ingredients into the wet ingredients until thoroughly blended.

The original recipe (link) said to chill the dough for at least an hour but no more than 4... I chilled it in the freezer for about 20 minutes because that's all the time I had. I tried to make the cookies round-ish without taking the time to form them into balls when I put them on the cookie sheet - this helps keep the marshmallow cream sauce from running off the cookie. Bake them for about 10 minutes on 375. While they're baking, unwrap the Hershey's kisses for quick transfer. When the cookies come out of the oven, use a spoon to make an crater in each one and spoon a little (or a lot, depending on the size of the crater) marshmallow cream sauce into the craters. Add the Hershey's kisses, pushing down until you feel the kiss lodge into the cookie. Obviously, don't stack them because the marshmallow cream sauce doesn't harden. These are so delicious!

Thursday, May 23, 2013

Pineapple Sorbet

The battalion wives started out having bimonthly dinners for the solo wives, but they're so much fun that everyone comes anyway and just leaves husbands at home. Tonight we had and island themed dinner with some delicious kalua pork and Okinawan sweet potatoes, which were a first for me. They're purple, y'all. The gal who made them mixed in some coconut syrup, and they were delicious. My contribution was pineapple sorbet. It couldn't have been easier, and it was a really refreshing dessert.

1 fresh pineapple, cored, diced
3/4 cup coconut milk
1/2 cup sugar

Blend it all up in a blender. I put it in the ice cream maker (you could skip this) for about half an hour and then froze it overnight. I left it out on the counter for about 30 minutes for it it soften before we ate it. The original recipe (link) suggests adding a little rum to it, and I might try that next time I make it!

Thursday, May 16, 2013

Chicken Piccata

We knew that one of the very few downsides of living in Hawaii was going to be the high cost of everything. This proved to be true, but I'll be the first to say the beaches, rainbows, shave ice, friendly locals, slow pace of life, etc. etc. etc. far outweigh this minimal downside. That being said, we are making a conscious effort to try to eat out less. We have frequented a local Italian restaurant in Kailua on the suggestion of several people, and the chicken piccata is my favorite thing on their menu. The sausage gnocchi is a top contender, but I haven't braved that yet. So in an attempt to eat at home a little more, I gave chicken piccata a try. I found this recipe in an old cookbook I have, and it was good! I'll definitely make it again.

2 chicken breasts, cut in half
1 cup Italian bread crumbs
1 egg, beaten
4 tbsp butter
1 cup chicken stock
1/4 cup lemon juice
1/4 cup capers, rinsed
1/4 cup fresh parsley, chopped
Angel hair pasta
Parmesan cheese

Melt 4 tbsp butter in a large skillet. Coat the chicken breasts first in egg and then breadcrumbs. Put the chicken breasts in the warm skillet, and cook them on low-medium heat for about 6 minutes on each side or until their cooked through. In a pot, bring the stock and lemon juice to a rollin boil. Turn the heat to medium and add the capers and parsley. Cover it and let it simmer for about 5 minutes. Toss the pasta with the sauce, reserving some sauce to top the chicken. I added a little extra squirt of lemon on the pasta and sprinkled a little Parmesan cheese on top.

Wednesday, May 15, 2013

Rum Chocolate Chip Cookies

I stumbled upon this when I was 3 steps in to making chocolate chip cookies and realized I was out of vanilla extract. I saw the imitation rum sitting there and thought it was worth a shot. And it was definitely worth a shot because these were really delicious.

3/4 cup butter at room temperature
3/4 cup brown sugar
1/4 cup  sugar
1 egg
2 tsp imitation rum extract
2 cups all purpose flour
2 tsp cornstarch
1 tsp baking soda
1/2 tsp salt
1 cup chocolate chips

Cream the butter and sugars. Add the egg and rum and let it mix. Once incorporated, add the flour, cornstarch, baking soda, and salt. Once the dough is formed, mix in the chocolate chips. Bake them at 350 for 10-12 minutes. The cornstarch makes them chewy and soft, and the rum was a great flavor!


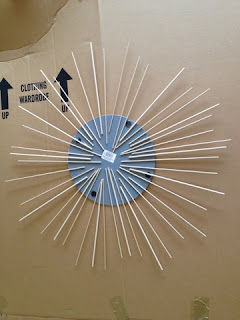
Star Burst Mirror

Now that there is a Pier 1 nearby, I'm always lusting after decor that is not in our budget. I figured I'd give one of these starburst mirrors a shot. I spent $8 on the mirror (the only craft store we have here is Ben Franklin, so it's definitely more pricey than mainland craft stores), $4 on 2 packs of dowel rods, and $3 on spray paint. So if it was a bust, I only blew $15. I was able to use the dowel rods for a couple of other things too, so I was hoping it wouldn't be a complete waste. I am pretty happy with how it turned out, though I would do a couple things differently if I were to do it over again. On the suggestion of a friend, I hot glued the dowel rods to the back of the mirror before painting them so I wouldn't have to rotate them and have them roll around when I sprayed. I used some of our leftover packing paper to cover the front of the mirror. I wish I had taped all the way around because some paint did get under the edge, but it was nothing a little paint thinner couldn't fix. I took a flat hanger off of an old picture frame and glued it to the back of the mirror. It turned out okay! I'll leave it up for a while and won't cry if it breaks in the next move.